|
Article
Credit /
Introduction / Images
Credit (required when
publishing all articles below)
Copyright Jeffrey Herman, hermansilver.com
Introduction (not required)
Jeffrey Herman started Herman
Silver Restoration & Conservation in 1984, and has built a
national reputation of quality craftsmanship and sensitivity towards
the finishing of every piece. Herman has repaired & reconstructed
everything from historically important tankards, tea services, and
tureens to disposal-damaged flatware. And yes, he will also polish a
single spoon or fork. He considers himself an environmentalist, using
the safest, non-toxic, most organic products whenever possible.
Before starting his business,
Herman worked at Gorham as a designer, sample maker, and technical
illustrator. Upon leaving Gorham, he took a position at Pilz Ltd.
where he learned the fine art of restoration. Herman earned a BFA
degree in silversmithing and jewelry making from Maine College of Art
in Portland, and is the founder of the Society of American Silversmiths.
He encourages anyone with
silver-related questions that can't be answered on his website
(hermansilver.com) to contact him. If you have a piece in need of
service, Herman invites you to e-mail an image of the object for an estimate.
Jeffrey Herman
Herman Silver Restoration & Conservation
PO Box 786
West Warwick, RI 02893
E-mail: jeff@hermansilver.com
Web: http://www.hermansilver.com
Images
If you would like
an image to accompany an article, you can find them here.
Finding
a Silver Restoration Specialist
Copyright Jeffrey
Herman, hermansilver.com
• Used by
Antique Homes Magazine, 2010
• Used by the
International Institute of Modern Butlers, 2009
You’re
cleaning a Revere porringer and it escapes your grasp, bouncing off
the tile floor causing a major dent. You stand there in horror,
afraid to even touch the piece. You have two choices: place it
back in the china cabinet with the undamaged side facing out, hoping
your employer won’t notice, or take the ethical high-road and
tell the porringer’s owner that you’ll have it
professionally restored. Hopefully you choose option two. So, where
do you go? My advice is to contact a decorative arts curator at a
museum housing a major silver collection, such as the Museum of Fine
Arts in Boston, New York’s Metropolitan Museum of Art, the Yale
University Art Gallery, or the Victoria & Albert Museum in
England, to name a few. These museum curators are knowledgeable as to
who will perform a proper restoration job because of their intimacy
with the medium. Another excellent source is to consult a notable
high-end antique silver dealer.
Silver
& Dishwashers
Copyright Jeffrey
Herman, hermansilver.com
• Used by The
Antique Trader, 2010
• Used by
Antique Homes Magazine, 2010
• Used by The
Journal of Antiques and Collectables, 2010
KEEP SILVER OUT OF
THE DISHWASHER! It's that simple. There are four major reasons for
keeping your prized sterling and silverplate out of the "chamber
of doom:" (1) Any factory-applied oxidation (the black patina in
recessed areas) will eventually be removed. (2) The harsh detergent,
combined with the washer's high cleaning temperature, is much too
abrasive for silver—it will eventually turn it grey or white,
with a dull, non-reflective surface. (3) Most older and some repaired
hollow-handled knives are filled with pitch. This low-melting cement
will expand with heat, possibly forcing open a thin solder seam, or
exploding the knife blade out of the handle. (4) Silver that touches
stainless in the dishwasher can create a chemical reaction, producing
black spots or pitting on the stainless and possibly requiring the
silver to be professionally refinished.
Sterling, like a
fine automobile, must be handled with tender loving care. You
certainly wouldn't drive your Rolls Royce through a car wash, would you?
Removing
Coffee & Tea Stains
Copyright Jeffrey
Herman, hermansilver.com
• Used by
Antique Homes Magazine, 2010
• Used by The
Journal of Antiques & Collectibles, 2010
Place the pot in
the sink with a cotton towel underneath and fill the pot with warm
water. Drop in one five-minute denture cleaning tablet (about five
cents each) per two cups of water. Let stand for ten minutes. If it
looks like the pot may overflow because of the effervescence, pour
out some liquid through the spout (don't allow the liquid to run down
the outside of the pot). When the ten minutes is up, empty the pot
through the spout then rinse with warm water. You may find that the
effervescing action of the tablets may remove only the grime and not
the stains. Use a moist cellulose sponge and non-lemon-scented
phosphate-free detergent to remove any remaining grime, then rinse
with warm water. If you need more scrubbing power, use the natural
fibers of 3M's Scotch-Brite Greener Clean Sponge which are more
gentle than their Scotch-Brite Non-Scratch Scrub Sponge. If the pot
opening isn't big enough to fit your hand, make a swab by wrapping
the sponge or pad on the end of a wooden dowel and secure the upper
end with electrical tape.
If stains remain,
moisten the sponge (not the scrub side) and apply a liberal amount of
Wright's Silver Cream, then wipe away the stain and rinse the pot
with warm water. Wright's is an excellent cleaner for this task
because it's much less abrasive than commercial cleaners that are not
meant specifically for silver. Don't use powdered abrasive cleaners
as they will impart fine scratches which will attract more dirt.
Don't use steel wool (too abrasive and rust may result on the
bottom), Scotch-Brite abrasive pads or dips (too toxic – see
section on Chemical Dips). A cotton swab with a small amount of
Wright's will remove stains within the spout opening. Fill the pot
with warm water and rinse out any polish that may remain in the spout.
Removing
Wax From Candle Holders
Copyright Jeffrey
Herman, hermansilver.com
• Used by The
Antique Trader,, 2011
• Used by
Antique Homes Magazine, 2010
• Used by The
International Association for Private Service Professionals, 2009
Do you become
frustrated when trying to remove wax from your weighted candle
holders? Do you go pawing into your flatware drawer to find just the
right size knife to dig out the wax? Do you run the piece under warm
water, only to create a big mess? Well, here are some simple,
non-invasive techniques.
Non-weighted
candle holders can be put in your freezer. Upon removing them, use
your fingernail (not a knife) to delicately chip off the wax. If
residue remains, remove it with silver polish or 91% isopropyl
alcohol on a cotton ball. (Isopropyl alcohol should always be used in
a well ventilated area.)
The following
procedure can be used for both weighted and non-weighted candle
holders. Use your hair dryer (but not a heat gun) to warm the candle
cup or other area coated with wax. Be careful not to get the object
too hot. There are three reasons for this warning: (1) If the
weighting material is pitch, it will melt. (2) If the piece is
lacquered, the lacquer will bubble off or burn (or both). (3) You
could burn yourself! Lightly touch the area with your fingertip to
make sure it is not too hot; then lightly wipe off the wax with a
soft paper towel or cotton ball. When cleaning out a candle cup on a
candelabrum, support the cup with your hand to prevent bending the
arm. If the opening is too small for your finger, gently stuff the
paper towel into the cup and twist. Cotton swabs also work very well,
especially on Hanukkah lamps with very small candle cups. Use as much
fresh paper towel or as many cotton swabs as needed; otherwise, you
will continually reapply the wax you are removing.
Use dripless
candles whenever possible and remove any wax residue from candle
holders after each use. Using these techniques will greatly reduce
maintenance time.
Why
Lacquering Silver is a Bad Idea
Copyright Jeffrey
Herman, hermansilver.com
• Used by The
Antique Trader, 2010
• The Journal
of Antiques and Collectables, 2010
• Used by the
International Institute of Modern Butlers, 2009
Lacquering
silver and silverplate is generally not recommended for a number of
reasons: 1. The individual may not properly prepare the object's
surface to accept the lacquer. 2. It's very difficult to obtain a
uniform coating, even when applied by a professional. 3. If the
coating is not applied well, it may have streaks and small holes,
allowing tarnish to form. 4. Lacquer will eventually yellow and
crack, allowing tarnish to form within the fissures and eventually
under the protective coating. Strong solvents must then be used to
remove the lacquer and the piece refinished. Take a look at these
pieces that were once lacquered by the traditional spray method.
In the case of
lacquering silver for museum display, Agateen lacquer #27 was found
to be the most successful coating as tested by the Winterthur Museum
conservation department. It is an incredibly time-consuming, toxic
process and must be done in a controlled environment as outlined here.
Renaissance Wax
Because of the
above issues, Renaissance wax – an archival micro-crystalline
product – is a better choice. Renaissance will not yellow or
crack and will last for years if handled properly. When applying
Renaissance, do so in small areas at a time (no larger than a 3"
square). Buff with a soft cotton cloth, cotton ball, or makeup pad
immediately. Overlap each area to insure the entire surface gets
coated. Renaissance is not as durable as lacquer, so the object
should be handled with heavyweight cotton inspection gloves as acid
from fingers may eventually remove it. Since dust can be acidic and
eventually wear through the wax, placing your silver in a closed
display will help insure that particulate will not fall on the
object's surface. Whether inside or outside a display case, every few
months gently wipe the object with a Selvyt cloth or soft cotton
cloth. This will keep the wax or silver polish with tarnish
protectant from breaking down prematurely. Renaissance should not be
used on flatware or other surfaces that will be used to eat or drink
from. It can of course be used on the exteriors of coffeepots,
creamers, and the like.
Meguiar's Quik Wax
Another tested and
proven long-term tarnish protectant is non-toxic Meguiar's Quik Wax.
This auto wax is sprayed on, then buffed with a cotton cloth. Though
non-toxic, Meguiar's should not be used on flatware or other surfaces
that will be used to eat or drink from. It can of course be used on
the exteriors of coffeepots, creamers, and the like.
I prefer Meguiar's
over Renaissance because it's 1. non-toxic, 2. easier to apply and
buff, 3. less expensive. Meguiar's can be found in most auto supply stores.
Accompaning
images on this subject can be seen here.
Higher resolution images can also be provided.
Removing
Labels (updated 7/7/2016)
Copyright Jeffrey
Herman, hermansilver.com
• Used by The
Antique Trader, 2010
• Used by
Antique Homes Magazine, 2010
• Used by The
Journal of Antiques & Collectibles, 2010
If you just purchased a silver
object with a price label that won't peel off, don't reach for a
scrubby pad or steel wool. Instead, try using a hair dryer (a heat
gun is too hot) to gently warm the label. (Do not use a hair dryer on
lacquered pieces.) The label should now peel off cleanly. If the
label leaves a sticky residue, wait for the piece to cool and try
removing it with some hand sanitizer, canola oil, or olive oil on a
cotton ball or makeup pad. If that fails, place a cotton ball or
makeup pad saturated with oil on the residue and let it sit for one
hour (don't worry, the oils won't harm your silver). If it didn't
work, try this method again until the adhesive has dissolved and wipe
away with a cotton ball or makeup pad. Use Better Life Natural Glass
Cleaner (which has a neutral pH) to remove any signs of the oil. If a
discolored spot remains where the adhesive had been, remove it with
Blitz Silver Shine Polish.
Note: Products like
Acetone, Goo Gone, Krud Cutter, Goof Off, and WD-40 will remove the
residue more quickly, but are less environmentally-friendly.
The
Removal of Engraving
Copyright Jeffrey
Herman, hermansilver.com
• Used by The
Journal of Antiques & Collectibles, 2010
A hand engraved monogram or
any type of decorative engraving is part an object's history and
unique to that piece. Removing engraving does not always make a piece
more salable, especially if the engraving is of high quality--quality
seldom seen today with the declining number of outstanding engravers.
Some tips for collectors and
antique dealers debating whether or not to have engraving removed:
(1.) If it is a tray or hollow piece, rub your fingernail under or
inside to determine if the metal is thick enough to have the
engraving removed. If you see a slight wave develop as you move your
fingernail, the piece is probably too thin. Remember, if the
engraving is removed you run the risk of caving in that area with
very little pressure. Can you imaging setting a coffee pot on a
footed salver and having it sink into the center? (2.) If you have
never used a repair service, test the reliability of the silversmith
with a small piece of damaged flatware first. A competent smith will
do a great job or suggest that the repair not be attempted at all.
(3.) If engraving is removed from a hollow form or tray and you would
like it re-engraved, have it done in a different area where the
material is thicker. An engraved area, especially on a thin piece,
will be rather weak.
If you must have engraving
removed, take the piece to a competent smith, otherwise it may be
ruined and the piece devalued. Engraving that has been expertly
removed will be undetectable on the surface. Upon removal of deep
engraving, on a coffee pot for example, the metal may have to be
pushed out from the inside to develop a level surface.
Educating
the Guardians of our History
Copyright Jeffrey
Herman, hermansilver.com
• Used by The
International Guild of Professional Butlers, 2010
I find it's time to discuss a
very troubling trend I've witnessed in silver displayed in museums:
over cleaning. Years ago, I visited a prominent northeastern museum
housing a large and impressive silver collection. Major presentation
and historically important American and European silver were on
exhibit. I was on a museum tour at the time, explaining to the other
silver aficionados in the group how some of the pieces were created.
I became alarmed at what I had been viewing: silver objects stripped
of every last bit of patina! I soon asked the docent why the
silver had been stripped, leaving it so white, so one-dimensional.
She replied: "The museum wanted to display the silver the way it
looked upon completion by the silversmith." I pointed out the
obvious purple-colored firestain that mottled many of the objects,
and that it would not have left the silversmith's workshop in that
condition. That the smith would have "fired" their piece,
then given it an acid bath to dissolve the copper from the surface of
the sterling, leaving a fine silver finish. Over decades of
polishing, the oxidized copper (or firestain) may be revealed.
Silversmiths, especially those practicing up through the 19th century
and into the 20th, probably would have patinated an ornamental piece,
giving it a more three-dimensional look. "That's just the
museum's policy," the docent said. I had the immediately urge to
confront the museum director and curator of decorative arts, but that
wasn't the time.
Modern "taste," fickle
at best, has no place in museum conservation. And, I am not alone in
thinking that museums over clean their silver. Recently, a spoon
collectors club visited my workshop. Below is an excerpt from an
e-mail I received from one of the collectors after the visit: "I
am always distressed to see museum silver with all the patina
carefully removed. New sterling is now even being sold looking as
though it just had a bath in Tarn-X."
Much time had passed from that
eye-opening day at the museum visit to receiving that letter. It is a
reminder of my responsibility to silversmiths long passed, to
collectors unknowing of possible impending alterations to their
bequests, and to museum decision makers entrusted with preserving our
history. Museums are considered the authority of how our objects
maintained. If ground-breaking or ill-conceived ideas are made
without consulting others in the field (and that includes
silversmiths themselves), irreversible mistakes will continue to be
made without the public's knowledge. And if we consider a museum's
policy to be the last word, we will then accept those poor
conservation techniques as our own.
Leveling
a Hinged Lid
Copyright Jeffrey
Herman, hermansilver.com
Teapots, coffeepots, boxes, ink
wells, and anything with a hinged top, may become unsettled in the
way they sit due to rough treatment. Perhaps you have a piece with a
springy top that simply won't sit level. You may be able to rectify
this problem yourself. Cut to length and place a flat toothpick
between the entire length of the two hinge plates and push, ever so
gently, on the sides of the lid with your fingers. Take notice of any
movement on the back side of the lid where the hinge palate is
attached. If the lid still doesn't sit level, repeat the process by
stacking additional toothpicks between the hinge plates.
Candlestick
/ Candelabra Thread Repair
Copyright Jeffrey
Herman, hermansilver.com
• Used by The
Antique Trader, 2010
• Used by The
Journal of Antiques & Collectibles, 2010
Over the years, weighted
candlestick and candelabra threaded inserts can become worn, allowing
them to continue rotating in the corresponding sockets without
properly “catching.” Redefining these threads properly can
be quite costly, since the pitch that is used as a reinforcing cement
must be removed before pushing out the threads from inside with
special tools.
In most cases, you can repair the
insert threads yourself, allowing them to fully engage the
corresponding socket threads. Go to your local hardware store or
furnace and duct supplier and ask for aluminum tape. This is aluminum
foil with an extremely sticky backing. Take the section with the worn
threads and cut a piece of aluminum tape the same width as the
threaded section. Remove the backing and wrap the aluminum around the
threaded insert and cut it as close as possible to meet with the
other edge. It’s better to be a little undersize than have to
overlap the seam.. Next, use finger pressure to massage the foil
securely onto the insert. Finish the job by using your fingernail to
trace the threads around the circumference of the insert, making them
more distinct.
Gently screw the insert into the
socket, testing how it “sits” without wobbling. If there is
still substantial play in the socket, allowing the insert to continue
spinning, wrap it with another layer of tape as described above.
Disposal
Damaged Flatware
Copyright Jeffrey
Herman, hermansilver.com
• Used by The
Journal of Antiques & Collectibles, 2010
Has a piece of your flatware ever
slipped down the garbage disposal? If so, you may have gone into
shock in regard to its mangling. The spoon bowl may have been
crushed, fork tines wrapped around each other, the handle folded in
half or even chopped into many pieces. A monogram may also have been
gouged. That piece of flatware, with the possible exception of hollow
handled knives, need not be taken to the refiner; it most likely can
be repaired to a functional state!
In order to correct the shape and
finish of the piece during its repair, it is recommended to send a
perfect duplicate piece for matching. Flatware that is highly
ornamental, especially on the handles, may not be economical to
restore. In this case you may wish to simply have any sharp or jagged
edges smoothed to make the piece useful once again.
If you feel the piece doesn't
warrant the repair expense, it can most likely be replaced through a
silver replacement service. Since many patterns over time have been
produced in different weights, it is best send a sample to the
service to be matched.
Types
of Weighted Sterling
Copyright Jeffrey
Herman, hermansilver.com
Weighted sterling is made in two
forms: structurally-weighted (for structural stability throughout)
and stability-weighted (so they won't tip over). There are also
objects that don't require structural or stability weighting, but may
be used in other ways, as in a removable leather-covered lead bottom
of a cigarette box.
Structurally-weighted objects
have been made since the late 19th century. They are generally marked
"Weighted," indicating they have pitch or plaster
throughout hollow areas. This may include steel-reinforced candelabra
arms that would sag if not supported. The rolled rims may be the only
exception with any reinforcement. Weighted creamers and sugars, for
example, would be easily dented if not filled. Candlesticks weighing
one pound may weigh less than one-tenth their weight in actual
sterling content when empty. Structurally-weighted objects, sometimes
made with sterling as thin as .003" (thinner than 20-pound copy
paper), has been used to save on the cost of the precious metal.
Stability-weighted objects are
normally taller or broader pieces that require weighted bases so they
won't tip over. They are generally more valuable since they are made
of thick enough sterling to support themselves without any filler.
The bases can be filled with pitch, plaster, or lead, and have been
produced for centuries.
The
Realities of Weighted Sterling
Copyright Jeffrey
Herman, hermansilver.com
• Used by The
Journal of Antiques & Collectibles, 2010
The article below discusses
weighted sterling that is reinforced throughout the entire object.
These are pieces that would not be functional if the silver alone was
their only support.
You just forced a candle into one
of the candle cups of a weighted, two-arm candelabra. What you didn't
expect to experience was the arm being ripped from its stem. Have you
ever polished a candlestick and wondered what that rattling noise
was? I know all too well what that sound is: its cement (most
commonly pitch, which is made from various percentages of pine resin
and plaster) had reduced in volume when it was first poured, then
cooled inside the object, creating a void. This allowed pieces of
this brittle material to break off and rattle inside that space.
Weighted sterling may also contain, lead, wax, sand, or some other
material for support. Since the sterling is very thin (I've measured
metal thickness as thin as .003"), there is then not enough
support for that area of your object to withstand a dent when lightly
tapped against a hard surface. You'll also find pitch inside most
dresser brushes and hand mirrors that probably show signs of denting
from even the most cautious user. You may have seen a dresser brush
with very deep embossing, revealing a cherub with a hole in its nose.
At that very point, the material may have been only .002" thick
when it came out of the factory. Sliding the brush over a dressing
table a few times and heavy-handed polishing may have been all it
took to go through that nose. If these pieces were not weighted, they
would almost collapse! If you are the victim of one of these pieces,
I know your frustration.
What you may not be aware of is
that although your candelabra may weigh a hefty four pounds (64
ounces), in reality it contains only about 6.4 ounces (5.83 troy
ounces) of sterling! Simplified, this means your candelabra is
composed of 10% sterling and 90% pitch. So, if you wanted to scrap
that candelabra using a $10 silver market, the refiner would pay you
no more than $48. Something else to keep in mind: many refiners will
also charge a refining fee of $50 or more. You just lost two dollars!
Stunned? You're not alone.
Welcome to the sad reality of
weighted sterling. When the silver companies first introduced objects
that were made of this paper-thin sterling, they intended on making
utilitarian holloware and dresserware that was more affordable to the
mass-market. Though you may have thought you were purchasing a
quality piece of silver, it later turned out to be nothing but
aggravation in its use and cleaning.
Handling
Weighted Sterling
Copyright Jeffrey
Herman, hermansilver.com
• Used by The
Antique Trader, 2010
• Used by The
Journal of Antiques & Collectibles, 2010
1. Do not display in a window
where the sun will soften the pitch, possibly making the object or
appendage droop.
2. Keep away from fireplaces and ovens.
3. Of course you would never put
a weighted piece (or ANY sterling) in the dishwasher.
4. Always support a candelabra
arm underneath when inserting a candle.
5. Never overtighten threaded
candelabra arms or candlestick components.
6. Gently polish and support the
piece when working on delicate areas.
7. Use only tepid water when
rinsing polish from the object.
8. Never expose dresser brushes,
hand mirrors, or related objects to liquids.
9. Do not soak weighted pieces as
there may be voids in hollow areas that will fill with liquid.
10. Dresser brushes, hand
mirrors, and related objects should always be gently placed on a
cotton or flannel cloth on your dressing table to avoid unnecessary wear.
11. If you hear rattling, be
particularly cautious in that area because it is not reinforced inside.
Slicing on
Silver
Copyright Jeffrey
Herman, hermansilver.com
• Used by The
Antique Trader, 2010
• Used by The
Journal of Antiques & Collectibles, 2010
I'm sure you would agree that
sliced roast beef looks elegant when presented on a silver tray. What
you may not realize is that under that beautiful presentation may lie
true ugliness, unknowingly created by you. Those deep slicing lines
(and possibly linear dents) will absolutely decrease the tray's
value. Never cut meat or anything else on a sterling or silver-plated
tray. Always cut food on a cutting board, then place it on the
silver. On silver-plated trays, this is especially important, since
you will be cutting through the silver plating and into the base
metal, requiring the piece to be refinished and replated. Never let
food sit on a tray longer than necessary as salty juices may, over
time, increase the possibility of surface corrosion and pitting.
Preventing
Rust on Carbon Steel Blades
Copyright Jeffrey
Herman, hermansilver.com
• Used by The
Journal of Antiques & Collectibles, 2010
Flatware
containing unplated carbon steel knife blades require protection, or
rust will develop. After dinner, hand wash the knives in warm
water, then dry immediately. Apply a very thin layer of Burt's Bees
Lip Balm on the blade and wipe with a paper towel until there is no
residue left behind. This will keep the blades from rusting. Since
this product is non-toxic, you won't have to wash them prior to use.
If these knives become to taxing to care for, new stainless steel
replacement blades are available.
White
Spots
on Plated
Objects
Copyright Jeffrey
Herman, hermansilver.com
This phenomenon
usually occurs on a freshly plated piece with moisture migrating to
the surface. Even if the piece was properly dried after plating, some
spots may still appear over a short period of time. This is
especially true if the base metal is a lead alloy or pewter that was
not nickel plated before being plated with fine silver. The nickel
would normally keep any moisture from migrating to the surface.
Polishing usually makes these spots disappear, but often only on a
temporary basis. To achieve a more permanent fix, after polishing,
heat the piece with a hair dryer (do not do this if your piece is
weighted) until it is warm to the touch. You may have to repeat this
procedure a few times until the white spots no longer appear.

Packing
Silver for Shipping
Copyright Jeffrey
Herman, hermansilver.com
• Used by
Antique Homes Magazine, 2010
• Used by The
Antique Trader, 2010
• Used by The
Journal of Antiques & Collectibles, 2010
• Used by the
International Institute of Modern Butlers, 2009
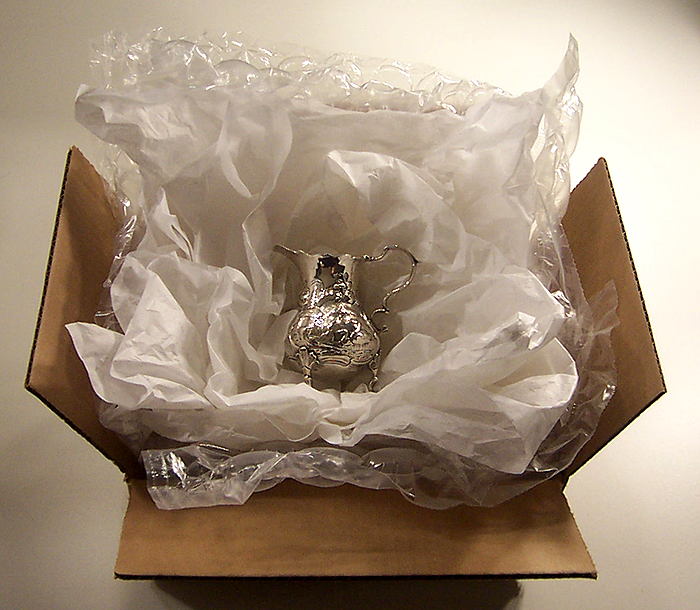
The following
instructions are tried and true techniques when shipping silver.
Firstly, wear cotton or nitrile gloves, as finger prints will etch
silver. Objects, such as sectional candelabras, should be
disassembled and wrapped individually. Use non-buffered tissue which
has a neutral ph and won't promote tarnish. For delicate pieces, such
as handled baskets and epergnes, crumple the tissue and place it in
all open areas so all components will be supported. Next comes
the bubble wrap which will further cushion the object. Use as little
tape as possible when securing the bubble wrap. Wrapping the entire
bubble-wrapped object with packing tape makes it almost impossible to
remove the piece without using a knife, which could damage the
silver. A preferred technique is to take the wrapped object and place
it in a plastic bag with a 3M or Intercept Anti-Tarnish Strip. These
strips absorb tarnish-producing gasses and are especially important
if the piece is going to be stored for an extended period. Pack the
object in a structurally sound 200 lb. test carton. Each piece should
have a minimum of 2" (preferably more) of padding between it and
other piece(s) or the sides of the carton. The carton should be
filled with Styrofoam peanuts, bubble wrap, or densely crumpled paper
to snugly cushion the item(s). There should be NO inside movement
after the carton has been taped.
When shipping
flatware in a fitted chest, wrap the pieces in tissue paper so that
they don't scratch each other during transport. Take two sheets of
tissue paper and place a piece of flatware on the end closest to you.
Roll the piece in the tissue paper until it is fully covered, and
then place the next piece against the first and roll again until the
second piece is covered. Continue in this fashion until you have
reached the end of the tissue paper, and then continue with
additional paper until all the flatware is wrapped. If you have any
carving knives or forks, use some additional tissue paper to wrap
their sharp tips. After placing the flatware back in the chest, fill
any voids with additional paper to prevent movement of the pieces
during shipping. If there are some pieces that won't fit without
straining the hinges of the chest, wrap them with additional padding
and place them in a polyethylene bag (such as a Ziploc). If you
will be storing the chest and its contents for more than two weeks,
use acid-free tissue paper and place half a sheet of a 3M or
Intercept Anti-Tarnish Strip in each bag. This should keep your
flatware tarnish-free for over a year.Always
remove flatware from a flatware chest and wrap the pieces,
otherwise, any bouncing in transit could lead to scratching.
Don't
Trust All Silver Polishing Videos!
Copyright Jeffrey
Herman, hermansilver.com
• Used by The
Antique Trader, 2010
• Used by the
International Institute of Modern Butlers, 2009
I have viewed
numerous online videos demonstrating harmful silver polishing
techniques. Do not trust everything you see online regarding silver
care! Some of these videos, produced by well-intentioned but
ill-informed individuals, show the use of horribly abrasive products
such as Nevr-Dull, toothpaste, or baking soda. Some advocate the use
of the toxic product Tarn-X which, although not abrasive, will remove
factory-applied patinas, and will actually promote the formation of
tarnish. The aluminum foil technique (in which the user is encouraged
to soak silver in water containing baking soda and a piece of
aluminum foil) will also allow tarnish to form more quickly. Also,
many videos say that it's okay to put silver in your
dishwasher–that's not true!
Please take time
to read my Silver Care Guide: http://hermansilver.com/care.htm.
Dangerous
& Destructive Chemical Dips
Copyright Jeffrey
Herman, hermansilver.com
As a silver
restoration and conservation specialist, I have many years of
knowledge about chemical dips. I routinely receive objects for
refinishing due to damage from these horribly destructive products.
Chemical dips work
by dissolving the tarnish (and silver!) on an object at an
accelerated rate. Dips are used by silver restorers when heavy black
tarnish cannot be removed with liquid or paste polishes. Chemical
dips are wiped over the object with a cellulose sponge or cotton
ball, as submerging the piece for long periods will remove
factory-applied patinas and cause pitting of the object's surface.
These surface defects will act like a sponge and more readily absorb
tarnish-producing gases and moisture. The object may then require
professional polishing to restore the original finish.
Chemical dips are
made up of an acid and a complexing agent. Acids are corrosive and
will damage niello, bronze, stainless steel knife blades, and organic
materials such as wood and ivory. The ingredients can also be harmful
to the user, which is why silver restorers wear nitrile gloves and
work in a well ventilated area. Chemical dips should never be used on
objects that have sealed components, such as candlesticks and
trophies with hollow feet, or teapots with hollow handles. Once the
dip leaks into the cavity through small holes or imperfections in the
joints, it becomes virtually impossible to wash the chemical out. If
you're working on a baby cup with this type of rim, do you really
want an infant drinking from it?
How
to Identify
a Solid Silver Object
Copyright Jeffrey
Herman, hermansilver.com
• Used by The
Antique Trader, 2010
• Used by The
Journal of Antiques & Collectibles, 2010
Normally, if an object is solid
silver it will be indicated on the piece. Examples are: Sterling,
925, 925/1000, 900, Coin, Standard, 9584 (English Britannia), 800
(Germany), 84 (Russia), etc.). Most American-made objects are marked
on the bottoms of holloware and on the reverse on flatware.
Foreign-made objects can be marked most anywhere, and are sometimes
accompanied by additional marks applied in the country's assay office
which tests the quality of the precious metal during its manufacture.
Rarely will you find a piece made of solid silver that isn't stamped.
If an object isn't stamped, a non-invasive identification method is
judging by tarnish color. Silverplate will exhibit a blue-purple hue,
where solid silver will exhibit grey-black. If you cannot determine
if an object is solid silver, consult a silversmith or jeweler who
may use an acid test.
Silver
With Loose and Deteriorated Components
Copyright Jeffrey
Herman, hermansilver.com
• Used by the
International Association for Private Service Professionals, 2010
• Used by The
Antique Trader, 2010
Over time, insulators, handles,
finials, inserts, and other porous components of tea- and coffeepots,
sauce pans, wine bottle coasters, hairbrushes, and the like can
become loose and/or cracked. This may be the result of natural
shrinkage, aggressive handling, or running water over the component
and allowing moisture to enter the socket or ferule that holds it in
place, causing rot that can't be seen. These susceptible materials
include: wood, ivory, baleen, rhino horn, mother-of-pearl, and
tortoise shell, among others.
Unstable objects that are used on
a daily basis will only become more unstable over time. This can lead
to crumbling insulators, a broken-off handle, or a warped coaster
bottom, with additional damage occurring to the object's body. Here
are some suggestions:
1. Always support a teapot or
coffeepot from the bottom when holding it by the handle.
2. If a handle or brush is loose,
have it secured by a reputable silver restoration specialist. Have
broken or rotted components stabilized or replaced;
3. Never allow water to come
into contact with porous components;
4. Remove dried polish with a
cotton ball, Q-Tip, or soft brush;
5. With a lint-free cloth, apply
three coats of a high-quality, crystal-clear carnauba paste wax which
will protect against moisture and deterioration. This wax will also
prevent silver polish from accumulating in wood pores;
6. It is safe to clean or polish
an object if: (a) components are securely held in place and there are
no gaps through which moisture can seep into hollow areas and (b) wax
has been applied to the components. (Hairbrushes, nail buffers, and
combs should be cleaned only with non-abrasive, unscented, aloe-free
hand sanitizer, or with silver polish that is allowed to dry, and is
then buffed off);
7. Periodically re-wax porous components;
8. Consult a silver restoration
specialist with any questions.
Silver:
An Element of Good Health
Copyright Jeffrey
Herman, hermansilver.com
• Used by The
International Association for Private Service Professionals, 2010
• Used by The
Journal of Antiques & Collectibles, 2010
If you're a silver lover, here's
something else you'll appreciate about this lustrous metal: it can
kill or suppress the growth of microorganisms such as bacteria, mold,
and fungus.
Silver's association with
anti-bacterial properties has long been established. The ancient
Phoenicians knew enough to keep water, wine and vinegar in silver
vessels to ensure freshness. It is only recently, however, that
scientists have discovered why silver works. Quite simply, silver
interrupts the bacteria cell's ability to form the chemical bonds
essential to its survival. These bonds produce the cell's physical
structure so when bacteria meets silver it literally falls apart.
Stainless steel doesn't offer
these benefits nor does it retain its value. Why not buy something
that has been staving off illnesses naturally for centuries? Consider
drinking from a silver goblet or eating from flatware an elegant way
to stay healthier. And when it's time to pass down your silver to the
next generation, you can extol silver's health benefits as well. |